
Advanced High Jump Coaching Techniques: What to Look for and How to Fix It
Most of the technical problems I see in developing high jumpers aren't random. They cluster around the same four or five mechanical breakdowns, and they almost always trace back to the same root causes. Once you know what to look for, you stop reacting to symptoms and start correcting the actual problem.
Quick Answer: Advanced high jump coaching comes down to three things — identifying the right flaw to fix, structuring feedback so it sticks, and using drill progressions that build real technique instead of just producing jumps.
This article covers the coaching frameworks I use with developing athletes: how to spot the flaws that limit clearance, how to organize a technical session, and which drill progressions to use at each stage of Fosbury Flop development.
The Four Technical Flaws I See Most Often
When I film an athlete for the first time, I'm watching four things specifically. These aren't the only technical problems in high jump, but they're the ones that show up most frequently and have the most direct impact on clearance height.
Flaw 1 — Inconsistent Approach Rhythm
The approach run isn't just about reaching the takeoff point. It's about arriving at the same speed, angle, and body position on every attempt. When an athlete's plant foot lands in a different spot jump to jump, nothing downstream can be consistent. The takeoff angle changes, the rotation is different, and the athlete ends up making last-second adjustments they don't even know they're making.
What causes it: most athletes start their approach from a different position each time. They eyeball it rather than mark it.
Coaching cue: mark the starting position with tape. Have the athlete count strides aloud during practice until the rhythm is automatic. Film ten consecutive approaches and watch the plant foot. If it varies by more than 10cm, the athlete isn't ready to jump from competition distances. Slow down and rebuild the pattern before adding bar height. See our complete approach run guide for J-curve geometry and stride consistency drills.
Flaw 2 — Upright Penultimate Step
The second-to-last step before takeoff should be slightly longer than the athlete's normal stride. This lowers the center of mass and loads the takeoff leg like a compressed spring. When athletes skip this, they arrive at the takeoff position tall and vertical — and they push forward rather than upward.
What causes it: anxiety about the bar. Athletes who rush the penultimate step are usually thinking about the bar, not the takeoff. That hesitation shortens the step.
Coaching cue: tell the athlete their penultimate should feel like they're about to sit down. Hips drop, weight loads back slightly. A useful drill: place a low cone or hurdle two steps out from the plant mark. The athlete's stride over it naturally enforces the longer penultimate step. Watch from the side — you should see the hips visibly lower before the final step drives upward. The full mechanics of plant foot positioning and takeoff leg drive are covered in our high jump takeoff mechanics guide.
Flaw 3 — Late or Uncoordinated Arm Drive
Both arms should swing upward together as the plant foot contacts the ground. The arm drive contributes directly to vertical velocity and initiates the rotation needed for the Flop. When one arm swings late, or when athletes use only their lead arm, they lose force at the exact moment they need it most.
What causes it: athletes who haven't drilled takeoff mechanics in isolation. If they've only ever practiced the full jump, the arms follow instinct rather than a trained pattern.
Coaching cue: drill the arm swing separately before connecting it to the full jump. Have the athlete stand facing a wall one step away, take a step, and jump — both hands should nearly reach the wall at peak height. If the arms are at waist level at max height, the timing is off. Ten to fifteen repetitions before each jumping session until the coordination is automatic.
Flaw 4 — Looking for the Bar During Flight
This breaks more clearances than any other single technical error in developing athletes. When the head tips forward to find the bar, the shoulders follow, the arch collapses, and the athlete's backside drops into the bar. Athletes with technically sound approaches and takeoffs knock the bar down repeatedly because of this one habit.
What causes it: it's instinctive. Athletes want to know where the bar is.
Coaching cue: before each jump, have the athlete identify a fixed visual reference — a spot on the ceiling, a tree branch, the top of the pole. Eyes stay on that point from takeoff through flight. A drill that reinforces this: back layout jumps onto a low mat without a bar present. The athlete should land looking at the ceiling every time. If they're looking at the mat, head position needs more work before adding a bar.
For the data layer behind these observations — how biomechanical analysis and video tools quantify what coaches see — see our sports science high jump guide.
- Inconsistent approach rhythm traces to inconsistent starting position — mark it with tape, don't eyeball it
- Upright penultimate step means the athlete is thinking about the bar, not the takeoff — use a cone drill to enforce the drop
- Late arm drive costs vertical velocity at the exact moment force is needed most
- Looking for the bar during flight collapses the arch — fix head position before adding height
💡 Pro Tip: Film ten consecutive approaches to establish plant foot consistency baseline — variation under 10cm is the progression gate
💡 Pro Tip: Use a low cone 2 steps from the plant mark to teach the penultimate step drop passively — no verbal cue needed
💡 Pro Tip: Drill the wall jump arm pattern 10-15 reps before each jumping session until coordination becomes automatic
💡 Pro Tip: Use barless back layout jumps to train head position before reintroducing the bar
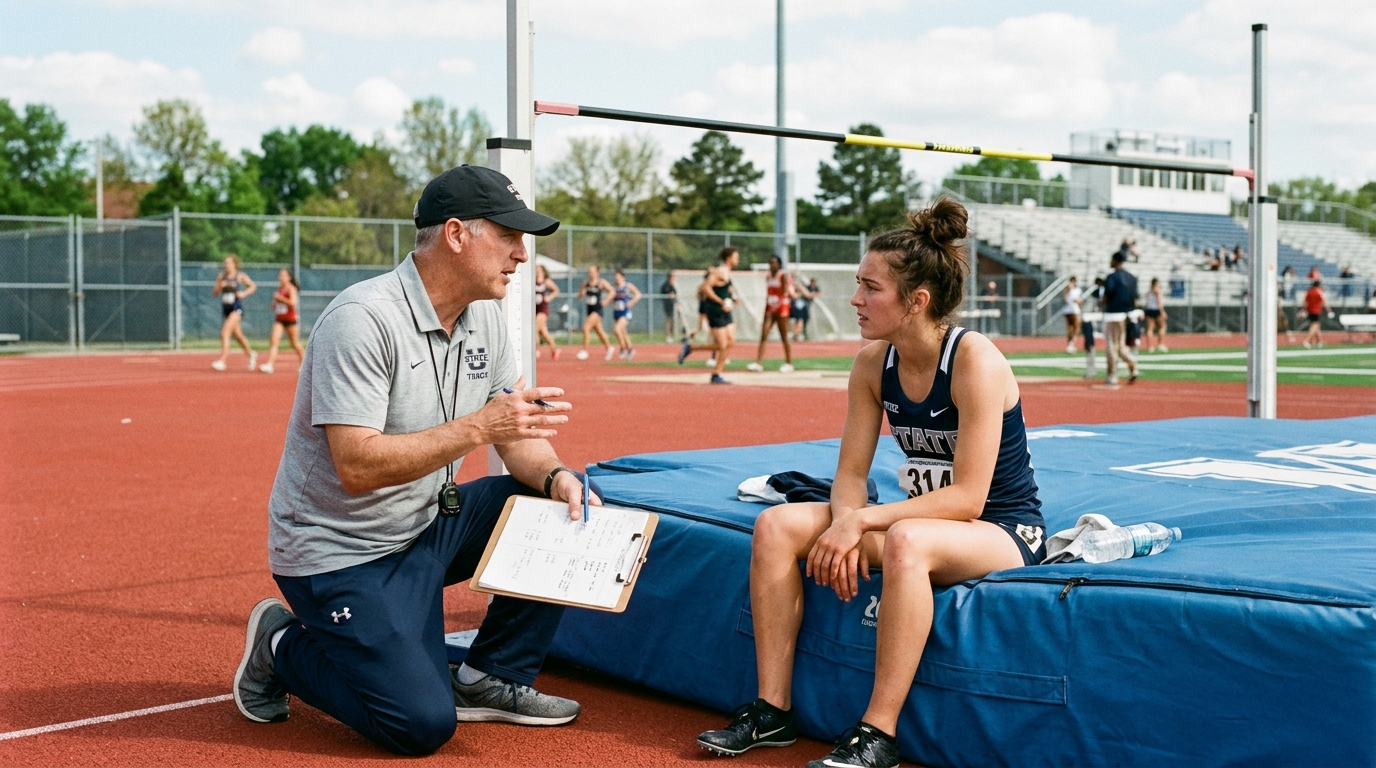
How to Structure a Technical Feedback Session
The biggest coaching mistake I see — and one I made early in my own career — is giving athletes too many corrections at once. An athlete trying to fix their penultimate step, arm drive, and head position simultaneously will fix none of them. Working memory during a complex motor skill like high jump doesn't have the capacity for that.
The One-Correction Rule
Identify the single technical issue limiting clearance most. Work on that one thing exclusively for the session. It's frustrating when you can see three problems and address only one — but the athlete makes faster progress this way. The second problem becomes the next session's focus.
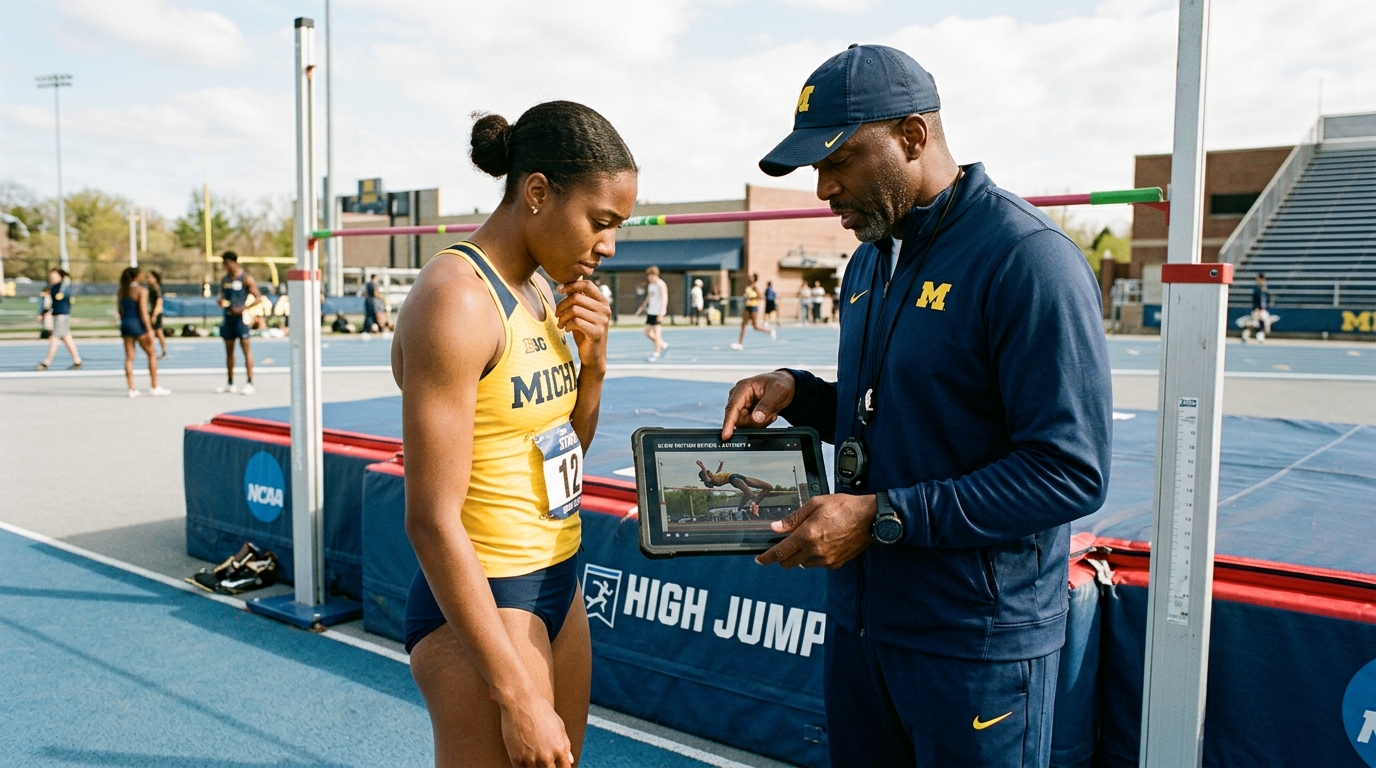
Film First, Coach Second
I don't give significant technical feedback on a jump I haven't filmed. What coaches see in real time — especially at takeoff and during flight — is incomplete. Slow-motion footage from the side and from the front reveals positions that are invisible at full speed.
More importantly: show athletes the film before telling them what's wrong. Ask them what they notice. Athletes who can self-identify technique errors develop faster than athletes who wait to be corrected. You're building the internal feedback loop they'll need when you're not standing there.
Separate Technical Sessions from Performance Sessions
Technical work should happen when the bar is low and there's no performance pressure. Asking an athlete to fix their arm drive while also trying to clear a PR height puts competing cognitive demands on the same movement.
I run two kinds of jumping sessions: technical sessions (bar well below PR, focus on one cue, outcome doesn't matter) and performance sessions (standard height progression, technique is expected to hold). These are not the same day.
- One correction per session — working memory can't process multiple technical changes during complex motor skill execution
- Show athletes their own film before providing feedback — self-identification builds faster long-term correction than coach-directed feedback
- Technical and performance sessions serve different purposes and should never share the same day
- Low bar plus single cue focus are the conditions where technique actually changes
💡 Pro Tip: Before each session, identify one technical priority and write it down — don't deviate during the session regardless of what else you observe
💡 Pro Tip: Film from the side and front every technical session, not just at meets
💡 Pro Tip: After filming, ask the athlete 'What did you notice?' before giving your own assessment
💡 Pro Tip: Label sessions in your training plan explicitly as Technical vs. Performance — treat them as different sessions with different success criteria
Drill Progressions for Teaching the Fosbury Flop
The Fosbury Flop looks complex, but it's teachable if you build it in the right sequence. Trying to teach the complete jump before the athlete has the component skills produces athletes who fake the Flop rather than execute it.
Phase 1: Back Layout (No Bar)
The athlete needs to be comfortable in the inverted position before adding a bar. Place a large mat at waist height. Have the athlete stand with their back to the mat, take a small hop backward, and land on their upper back with arms out wide. Head stays neutral, eyes up. This is not a jump yet — it's a controlled fall that builds comfort with the inverted position.
Sets/reps: 3 sets of 5. Progress only when the athlete lands consistently on the upper back — not the lower back or side — and shows no hesitation in the movement.
Phase 2: Short Approach Takeoff
From a 3-step curved approach, have the athlete jump and reach upward with both arms — no bar, no mat rotation. The focus is purely on the takeoff: the penultimate step drop, the arm drive, and the vertical explosion.
Watch the plant foot angle and the hip height at takeoff. The athlete should leave the ground with a slight backward lean, not vertical. If the hips aren't higher than the shoulders at peak height, the takeoff angle needs adjustment before adding the Flop rotation.
Sets/reps: 5-8 jumps per session, filmed from the side every time.
Phase 3: Integration at Low Bar
Set the bar 6-8 inches below the athlete's standing reach. This removes clearance anxiety and lets the athlete focus on executing technique rather than worrying about the height. Combine the back layout position with the short approach takeoff. Cues at this stage: curved approach, penultimate drop, arms up together, eyes on ceiling, arch, tuck legs.
Do not raise the bar until the technique is consistent at this height. Consistent means the athlete clears it 8 of 10 attempts using correct form — not 8 of 10 using whatever works. Bar height is a reward for technique, not a test of courage.
The Drill Practice Cards provide a printable session reference for all three phases, with coaching cues and rep schemes formatted for trackside use.
- Phase 1 back layout removes bar anxiety and builds comfort with the inverted position — don't skip it
- Phase 2 short approach takeoff isolates the penultimate step, arm drive, and lean mechanics before adding rotation
- Phase 3 integration happens at 6-8 inches below standing reach — the bar height that eliminates clearance anxiety
- Progression criterion is 8 of 10 clearances with correct form, not 8 of 10 clearances by any means
💡 Pro Tip: Phase 1: 3 sets × 5 back layout hops onto mat at waist height — progress only when landing is consistently on upper back with no hesitation
💡 Pro Tip: Phase 2: 5-8 filmed short approach takeoffs per session — hips above shoulder height at peak is the progression gate
💡 Pro Tip: Phase 3: set bar 6-8 inches below standing reach and hold it there until 8 of 10 technical clearances before raising
💡 Pro Tip: Track progression gates in your training log — athletes should know exactly what they need to demonstrate to advance
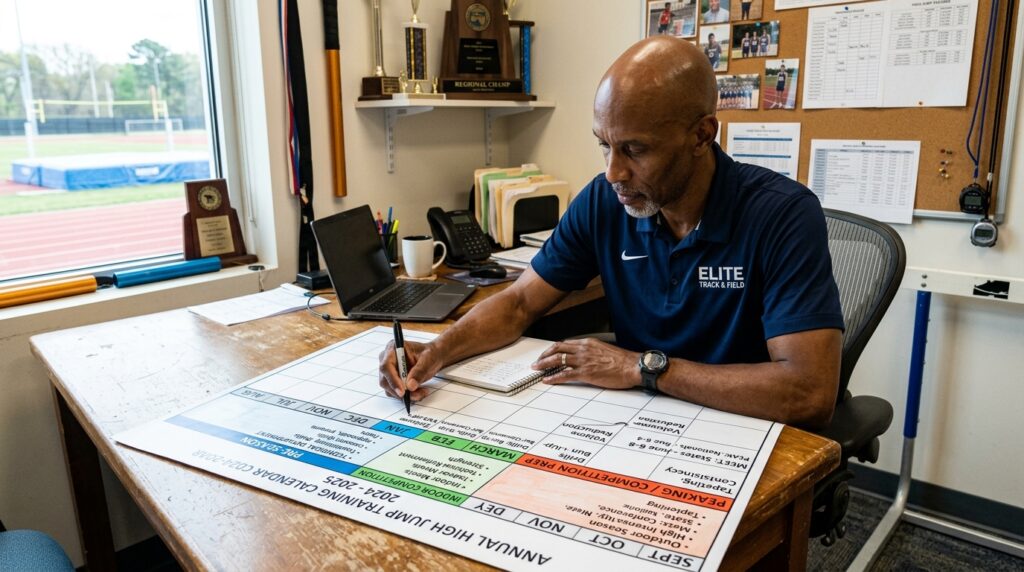
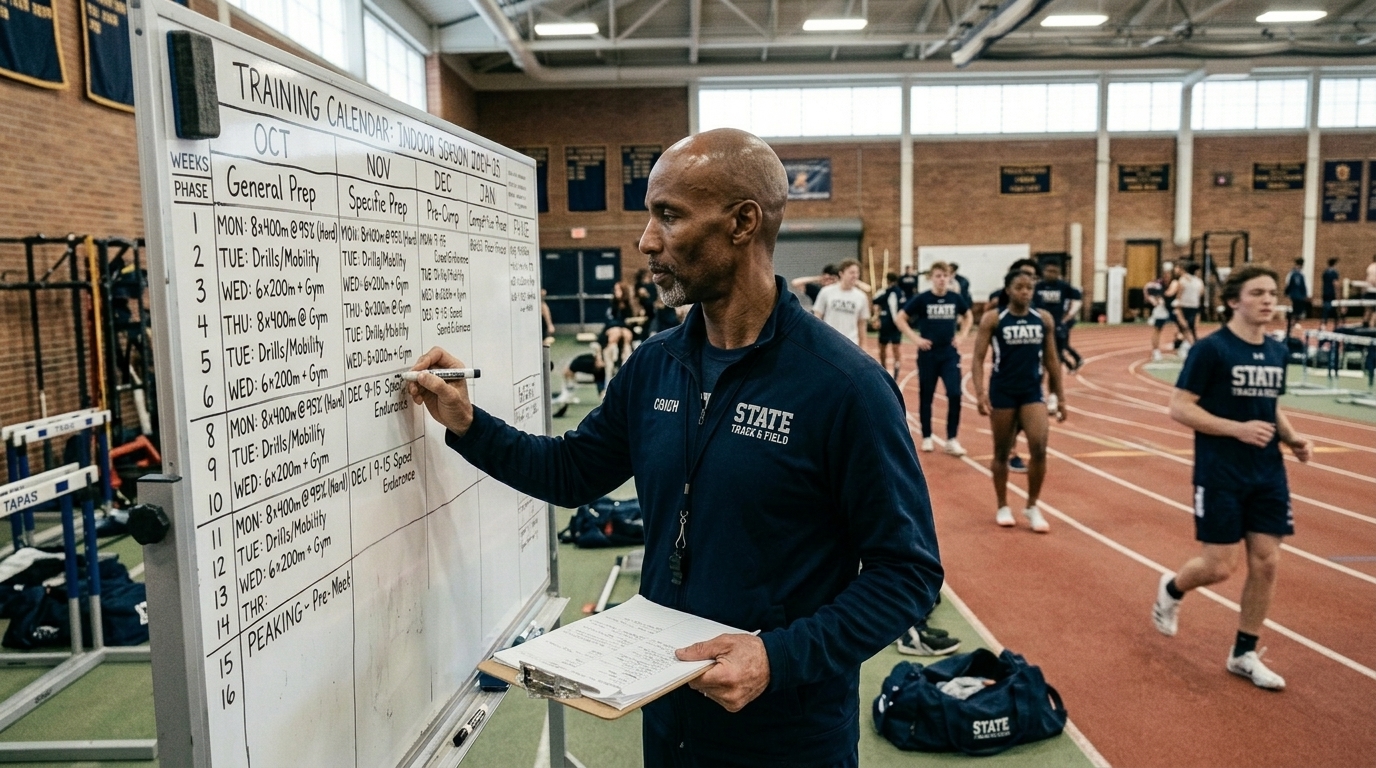
Structuring Technical Work Into the Coaching Year
Technical development doesn't happen in isolation from the training calendar. The best time to introduce new technique or make significant changes is during general preparation — early off-season, when there are no meets on the calendar and no performance pressure. Trying to make major technical changes in-season usually hurts performance before it helps it, because new motor patterns take time to become automatic under competition conditions.
Off-Season (First 8 Weeks)
Introduce technical corrections. Drill at low heights. Build the movement pattern without pressure. This is the window for Phase 1 and Phase 2 work from the drill progressions above. Any significant flaw — inconsistent approach rhythm, late arm drive, poor penultimate mechanics — needs to be addressed here, not in January.
Pre-Season (6-8 Weeks)
Reinforce technique under increasing load. Gradually raise bar heights. Add competitive pressure through training simulations — elimination formats, audience during practice, consequence-based sessions. Phase 3 integration work belongs here. The technique should be stable enough to hold under mild pressure before competition season starts.
Competition Phase
Maintain the technique the athlete has built. This is not the time to introduce new cues. If something is breaking down in competition, it's almost always because it wasn't drilled sufficiently during the off-season — not because a new cue introduced at the meet will fix it. Save the corrections for the following off-season. For strategies on helping athletes manage competition pressure and rivalry when it arises, see our competition psychology guide.
For a complete periodization framework mapped to the full training year — including mesocycle structure and deload scheduling — see our periodization for high jump coaches guide. For load management across each phase, including weekly jump volume targets and readiness markers by training stage, see our guide to managing training load for high jumpers.
- Major technical changes belong in off-season — new motor patterns need weeks to become automatic before they hold under competition pressure
- Pre-season is for reinforcing technique under increasing load, not introducing new patterns
- In-season technical corrections introduced at meets almost always hurt before they help
- If something breaks down in competition, document it and address it in the next off-season cycle
💡 Pro Tip: Map your technical priorities to the training calendar before the season starts — assign each flaw a specific phase window for correction
💡 Pro Tip: Off-season: Phase 1 and Phase 2 drill work only, bar kept low, no performance pressure
💡 Pro Tip: Pre-season: Phase 3 integration and add training simulations with mild competitive pressure to test technique stability
💡 Pro Tip: Competition phase: hold the cue list to 2-3 items maximum and don't change them between meets
FAQ
What are the most common technical flaws in developing high jumpers?
The four most common are inconsistent approach rhythm, an upright penultimate step, late or uncoordinated arm drive, and looking for the bar during flight. Each has a specific mechanical cause and a targeted coaching cue — addressing them one at a time produces faster improvement than trying to fix all four simultaneously.
How do you teach the Fosbury Flop to a beginner?
In three phases: first, build comfort with the inverted position using back layout drills onto a mat with no bar. Second, drill the short approach takeoff mechanics in isolation — penultimate drop, arm drive, backward lean — without adding rotation. Third, integrate both at a bar height 6-8 inches below standing reach until technique is stable, then raise the bar. Don't skip Phase 1.
When should a coach make significant technical changes?
During the off-season, when there are no upcoming competitions. New motor patterns take several weeks to become automatic and will often cause performance to dip before it improves. Technical changes introduced during the competition phase almost always hurt before they help. Document in-season breakdowns and address them in the next off-season cycle.
How much feedback should a coach give after each jump?
One thing. Working memory during a complex motor skill like high jump doesn't have the capacity to process multiple corrections simultaneously. Identify the single highest-priority technical issue for the session, address only that, and move the next issue to the following session. Athletes given one clear correction make faster progress than athletes given three.
Conclusion
The athletes who develop fastest aren't the ones with the best raw ability. They're the ones whose coaches know which problem to solve first, structure feedback they can actually use, and build technique in the right sequence. Four flaws. One correction at a time. Film every session. Build the Flop in phases. Schedule technical work for the off-season when there's room to change. None of it is complicated. All of it requires discipline to follow consistently. That's the job.
Ready to Elevate Your Performance?
Download our full training guide and start your transformation today.
Join the Program