

High Jump Bar Clearance: The 3-Phase Wave Protocol Explained
Most athletes think bar clearance is the jump. It isn't. The jump is decided on the ground. Bar clearance is what you do with the height you've already earned.
Quick Answer: Bar clearance in the Fosbury Flop works through a sequential wave motion — head and shoulders rotate back first, the spine arches to push the center of mass below the bar, then the legs snap up to clear last. Each phase must happen in order. When the sequence breaks down, the bar comes down.
In my years analyzing approach mechanics and flight mechanics on film, the same three breakdowns account for the majority of bar contact at the high school and collegiate level: premature shoulder depression, loss of arch before the hips clear, and legs moving too early. All three are fixable — and they're all mechanical, not physical.
This article breaks down the complete clearance sequence using what I call the 3-Phase Wave Protocol, gives you the specific cues for each phase, and outlines the drill progression I use to build it from the ground up.
Why Bar Clearance Is the Last 10% — and Why It Still Matters
There's a widely cited coaching principle in high jump: 90 percent of what determines your clearance height happens before you leave the ground. The approach geometry, the penultimate step loading, the takeoff angle — those are the real performance levers.
Bar clearance is the remaining 10 percent. That sounds small until you're competing at heights where the margin between a clear and a miss is 5 millimeters. At that level, a technical flaw in the flight phase is the difference between a personal record and a third miss.
The other reason bar clearance deserves focused attention: it's the one phase athletes can practice in isolation. You can work clearance mechanics without a full approach, without full-speed takeoffs, without loading the body for injury risk. It's high-yield, low-risk technical work — which makes it a tool coaches underuse.
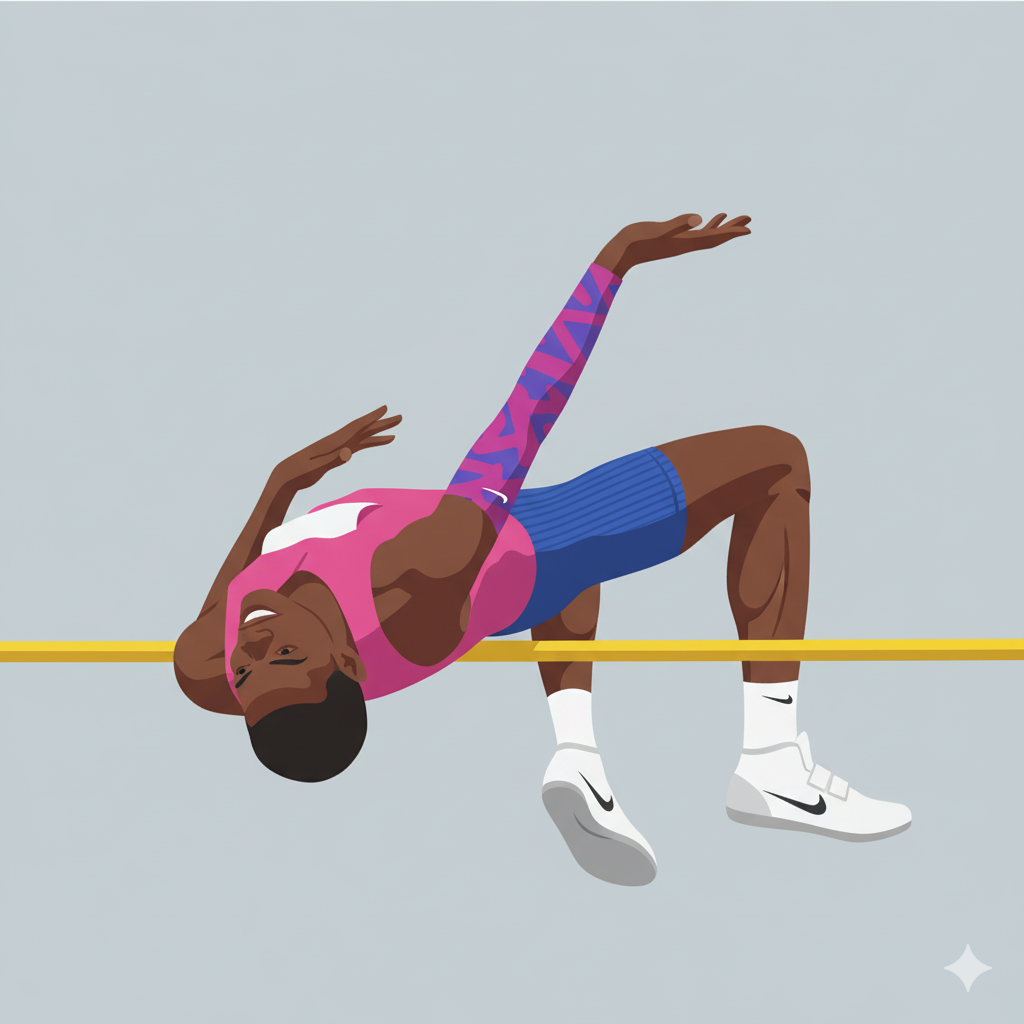
The foundational principle behind efficient clearance is center of mass management. The goal of the Fosbury Flop is to arch the spine so deeply that your center of mass — the average location of your body's mass — actually passes below the bar while your body travels over it. This is the only track and field event where an athlete can clear a height their center of mass never reaches.
For that to work, the body must cross the bar in the correct sequence. That sequence is what the 3-Phase Wave Protocol is built on.
- Ground mechanics determine 90% of clearance height — but technical flight errors waste that earned height
- Bar clearance can be isolated and drilled without full-approach loading
- Center of mass can pass below the bar while the body clears above it — this is the core biomechanical advantage of the Fosbury Flop
- Most bar contact is mechanical, not physical — it's fixable with the right cue sequence
The 3-Phase Wave Protocol: How Your Body Should Cross the Bar
Efficient bar clearance isn't a single position — it's a sequence of positions. The body crosses the bar one segment at a time, in a specific order. When athletes try to clear the bar all at once, they either hit it on the way up with their back or on the way down with their heels.
The 3-Phase Wave Protocol breaks clearance into three mechanically distinct moments:
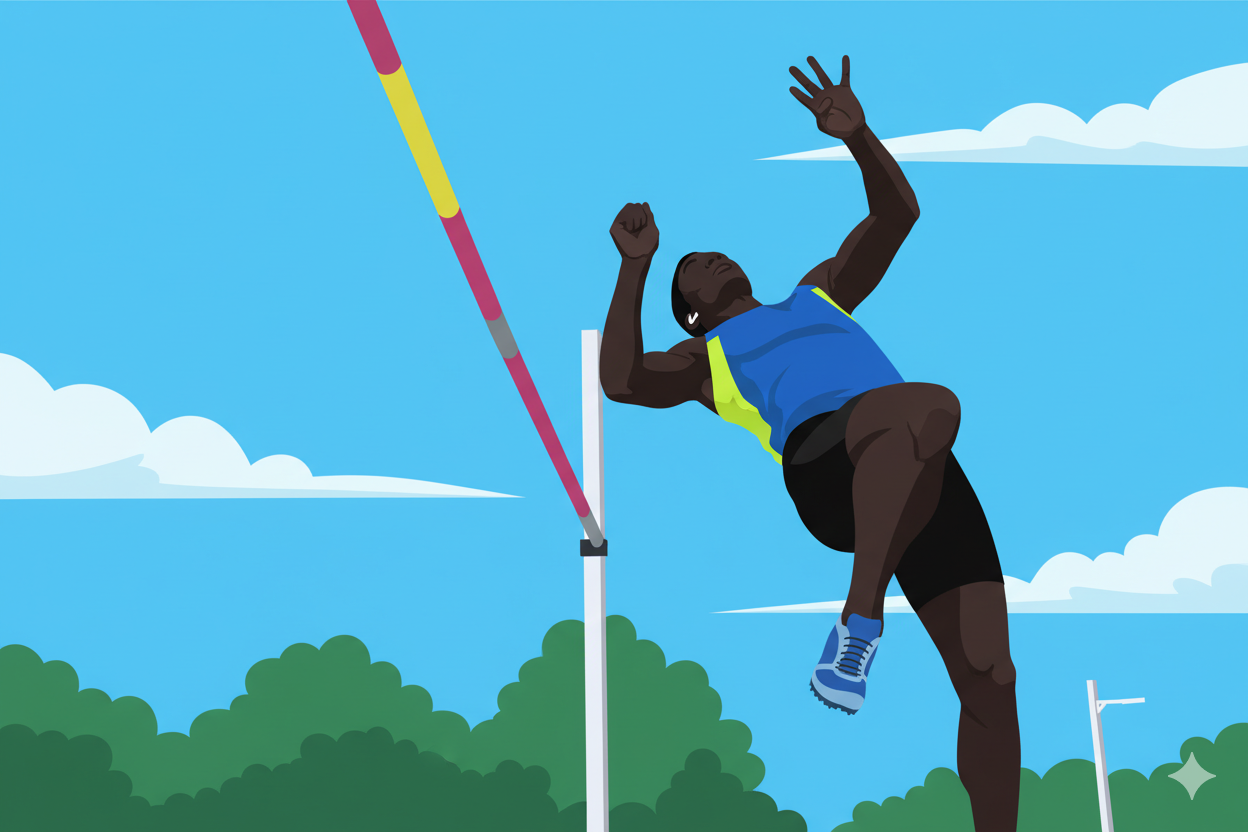
Phase 1 — Head and Shoulder Initiation
As the athlete becomes airborne and the hips approach bar height, the head drops back toward the landing mat and the shoulder blades pull downward. This is the initiation of rotation. The cue I use with athletes: "Find the mat with your eyes." When the athlete looks for the landing surface during the peak of the jump, the neck extension and shoulder depression happen automatically.
The common error here is initiating too early — dropping the head before the hips are at bar level. This kills vertical velocity by shifting the body's angular momentum prematurely.
Phase 2 — Spinal Arch
Once the shoulders have cleared the bar plane, the lumbar spine extends maximally to push the hips and stomach upward. This is the arch. The goal is not flexibility for its own sake — it's to create a concave shape that allows the center of mass to travel on a path below the bar while the body surface passes above it.
The coaching cue: "Drive the stomach toward the sky." Passive arching (just relaxing the back) is not enough. The arch requires active contraction of the spinal extensors. Athletes who lack this usually have the bar contact them in the lower back or hips — the part that should be the lowest point of the arc.
Phase 3 — Leg Release
The legs are passive through phases 1 and 2. Once the hips clear the bar plane, the knees straighten and the feet lift. Initiating leg drive before the hips clear is the most common source of bar contact in developing jumpers — the legs rising too early push the hips down.
The cue: "Legs move last. Wait until your hips are past." In practice, this feels like a delayed flick of the feet toward the ceiling.
- Phase 1: Head drops back + shoulders depress — initiates the rotation wave
- Phase 2: Active lumbar arch — drives stomach upward, pushing center of mass below bar
- Phase 3: Leg release — knees extend and feet lift only after hips have cleared
- All three phases must occur in sequence — simultaneous movement breaks the wave and raises contact risk
Center of Mass Mechanics: Why the Arch Is Physics, Not Flexibility
I want to be specific about the physics here because I see athletes spend months stretching their backs without improving their clearance. The arch is not a flexibility problem. It's a sequencing and activation problem.
Your center of mass is approximately at your navel when you're standing upright. When you arch your spine into the Fosbury Flop position, the center of mass drops — it exits the body entirely in a sufficiently deep arch, moving below your lumbar spine. That point in space can travel along a path that passes underneath the bar while your body surface travels above it.
The implication: an athlete with moderate flexibility who arches at the right moment clears heights that an athlete with extreme flexibility but poor timing cannot. Timing the arch to coincide with the hips being at bar level is the variable that matters.
What Kills the Arch:
Three mechanical errors consistently collapse the arch position during competition:
1. Leading with the chin. When the athlete's chin stays tucked rather than extending back, the thoracic spine (upper back) stays rounded. This prevents the lumbar arch from completing. The cue fix: "Chin to ceiling, then chin to mat."
2. Arms drifting too high. Arms raised above the bar create a longer moment arm and pull the athlete's back upward rather than allowing the deep arch. Elite jumpers finish with arms at or below bar level. The cue fix: "Elbows down, palms to the sky."
3. Insufficient speed into takeoff. This is a ground mechanics issue, not a clearance mechanics issue, but it manifests as poor arch. Slow approach speed reduces the centrifugal lean on the curve, which means the athlete arrives at takeoff with an upright posture rather than the inward lean that generates rotation. Without sufficient rotation, the body can't complete the arch sequence before the hips descend. Fix the approach before fixing the arch.
- The center of mass moves below the bar when the arch is sufficient — this is the mechanical advantage of the Fosbury Flop
- Flexibility enables the arch position; activation and timing produce it under competition conditions
- Three arch-killers: chin tucked too long, arms too high, insufficient approach speed
- Arch timing matters more than arch depth — a well-timed moderate arch outperforms a deep arch at the wrong moment
Bar Contact Diagnostic: What You're Hitting and Why
Bar contact has a location, and the location tells you exactly which phase of the wave failed. After years of video analysis sessions, I can identify the mechanical breakdown from a single frame of where the bar made contact.
Use this diagnostic before drilling:
| Contact Location | Phase Failure | Root Cause | Primary Fix |
|---|---|---|---|
| Back of head / neck | Phase 1 — Late | Head didn't initiate rotation early enough | "Find the mat" as hips reach bar height — not before |
| Upper back / shoulder blades | Phase 1 — Early | Shoulders dropped before hips were at bar height, killing vertical velocity | Delay Phase 1 until peak height — not during the rise |
| Lower back / lumbar | Phase 2 — Failed | Arch not activated — center of mass stayed above bar path | Drill spinal extension activation in isolation |
| Hips / glutes | Phase 2 — Incomplete | Arch initiated but collapsed before hips fully cleared | "Elbows down, palms to the sky" — arms too high pulling back upright |
| Back of thighs / heels | Phase 3 — Early | Legs moved before hips cleared — upward leg force pushed hips down | "Legs last. Wait for your hips." |
| Shins / toes | Phase 3 — Weak | Leg release timed correctly but insufficient snap force | Add leg snap drills; build hamstring flexibility |
This table is the starting point for every clearance session I run. Film the jump, identify the contact point, match it to the phase, apply the correction. The drill progressions in the next section are organized around the same phase structure.
- Bar contact location is a diagnostic tool — each contact zone maps to a specific phase failure
- Upper back contact = Phase 1 early (premature shoulder drop kills vertical)
- Hip/glute contact = Phase 2 incomplete (arch collapsed mid-flight)
- Heel contact = Phase 3 too early (legs moved before hips cleared)

The 3-Phase Wave Drill Progression
These drills are organized to build each phase of the wave sequence from stationary to full approach. Do not rush to full jumps. The purpose of this progression is to isolate the neural pattern for each phase before combining them under speed and height.
Drill 1 — Ground Arch Activation (Phase 2 Isolation)
Purpose: Build active lumbar extension and the muscle memory of the arch cue.
Setup: Lying supine on the landing mat.
Execution: Start flat. On the cue "Drive the stomach," extend the lumbar spine to create a bridge, shoulders and heels remaining in contact with the mat. Hold 3 seconds, release.
Volume: 3 sets × 8 reps. Rest 30 seconds between sets.
Drill 2 — Standing Bar Clearance, Back to Bar (All Phases, Stationary)
Purpose: Introduce the wave sequence without approach velocity.
Setup: Stand with back to the bar, bar set at hip height. Arms at sides.
Execution: Drop back over the bar from a standing position — head back first (Phase 1), lumbar arch (Phase 2), legs snap up last (Phase 3). Land on shoulders/upper back.
Volume: 5 attempts per set × 3 sets. Lower the bar if the wave sequence breaks down.
Drill 3 — 3-Step Clearance (Phased Approach)
Purpose: Add minimal approach momentum while maintaining wave sequence control.
Setup: 3 walking steps into takeoff, bar set 2–4 inches below practice max.
Execution: Same wave sequence as Drill 2. The added velocity will make Phase 1 initiation harder to time — this is the learning target. Reset the approach every rep; don't rush.
Volume: 6 attempts × 3 sets. One minute rest between sets.
Drill 4 — 5-Step Scissors → Flop Transition
Purpose: Reinforce takeoff linkage into the wave sequence before full approach speed.
Setup: 5-step approach into scissors kick for the first 3 reps, then transition to Flop for the next 3 reps at the same height.
Execution: The scissors reps anchor takeoff mechanics. The Flop reps practice maintaining that takeoff quality while adding the Phase 1–3 sequence in flight.
Volume: 3 scissors + 3 Flop × 2 sets.
Drill 5 — Full Approach at Practice Max Minus 3 Inches
Purpose: Integrate the wave sequence under competition conditions without bar anxiety interfering with mechanics.
Why minus 3 inches: Bar height creates cognitive load that disrupts the wave sequence. Practicing at 3 inches below max removes outcome pressure and allows the athlete to focus on phase execution. Once the sequence is clean at this height consistently, move the bar up.
Volume: 6–8 full approaches per session when this drill is the technical focus.
- Drill 1 (Ground Arch): Build active lumbar extension before adding flight conditions
- Drill 2 (Standing Back to Bar): Introduce all three phases without approach velocity
- Drill 3 (3-Step Clearance): Add minimal approach; Phase 1 timing is the target
- Drill 4 (Scissors → Flop): Anchor takeoff mechanics before applying the wave sequence
- Drill 5 (Full Approach, -3 inches): Integrate under competition conditions without bar anxiety
Frequently Asked Questions
Why do I keep hitting the bar with my hips in high jump?
Hip contact almost always means the spinal arch (Phase 2) is incomplete. The center of mass is still traveling above the bar rather than through it. Two common causes: arms drifting too high during the arch, which pulls the upper body upright before the hips clear, and insufficient arch activation — the back is passive instead of actively extending. Fix: drill Ground Arch Activation separately, then use the cue "Drive the stomach toward the sky" on every clearance attempt.
What is the wave principle in high jump bar clearance?
The wave principle describes how different body segments cross the bar in sequence rather than simultaneously. Head and shoulders rotate back first, initiating the movement. The spine arches deeply to push the center of mass below the bar. Finally, the legs snap up after the hips have cleared. Trying to cross the bar with the entire body at once results in contact because no single position can clear every segment simultaneously at the same height.
Why do I knock the bar down with my heels in high jump?
Heel contact is the signature of a Phase 3 error — the legs moved before the hips finished clearing the bar. When the feet rise too early, they create a counter-rotation that pushes the hips downward into the bar. The fix is a deliberate timing delay: hold the legs passive through the arch phase and only snap them upward after you feel the hips pass the bar plane. The drill cue is "Legs last."
How do I improve my arch in the Fosbury Flop?
Most athletes who struggle with the arch have an activation problem, not a flexibility problem. The lumbar extension needs to be actively driven — not just passively relaxed. Start with Ground Arch Activation drills lying supine on the mat: practice extending the lower back on a verbal cue without the distraction of approach speed or bar height. Once that muscle memory is established, the arch translates to full jumps much more reliably.
At what point in the jump should I start my arch?
The arch should initiate as the hips reach bar height — not during the ascent. A common error is beginning the arch on the way up, which kills vertical velocity by redirecting the body's momentum horizontally. The head should rise on the way up (chin to ceiling), then drop back toward the mat at peak height. The arch follows immediately after. The cue sequence is: "Chin up on the rise, chin back at the top."
Can I improve bar clearance without full approach jumps?
Yes — and for athletes learning or correcting the wave sequence, isolated drills are more effective than full jumps. The 3-Phase Wave Drill Progression starts with stationary standing clearance drills, works through 3-step and 5-step approaches, and adds full approach speed last. This builds the phase sequence as a reliable motor pattern before adding the cognitive load of full speed and competition height.
Conclusion
Bar clearance breaks down the same way for almost every athlete who struggles with it: the wave sequence gets compressed, reversed, or skipped entirely under the pressure of height and competition. The 3-Phase Wave Protocol doesn't require more flexibility or more strength. It requires the right sequence, timed correctly, drilled until it runs on autopilot.
Start with the diagnostic. Identify which phase is failing by where the bar makes contact. Build that phase in isolation before adding it back into the full sequence. Work the drill progression in order, resist jumping to full approaches before the isolated mechanics are clean.
Track Your Clearance Progress
The Bar Clearance Checklist maps directly to the 3-Phase Wave Protocol. Download it and bring it to your next training session.